• English
  • 简体中文
  • 繁體中文
  • 한국어
  • ภาษาไทย
  • Bahasa Melayu
  • 日本語
pixivision
Make it interesting
Explore
  • Illustrations
  • Manga
  • Novels
Create
  • Tutorials
  • Behind the Art
  • Materials
Discover
  • Interviews
  • Columns
  • News
  • Top
  • Behind the Art
  • Complete analysis of how to draw Ita-Nails! Kiyomitsu Kashuu Nails Tutorial (Touken Ranbu)
Behind the Art
2016.11.15

Complete analysis of how to draw Ita-Nails! Kiyomitsu Kashuu Nails Tutorial (Touken Ranbu)
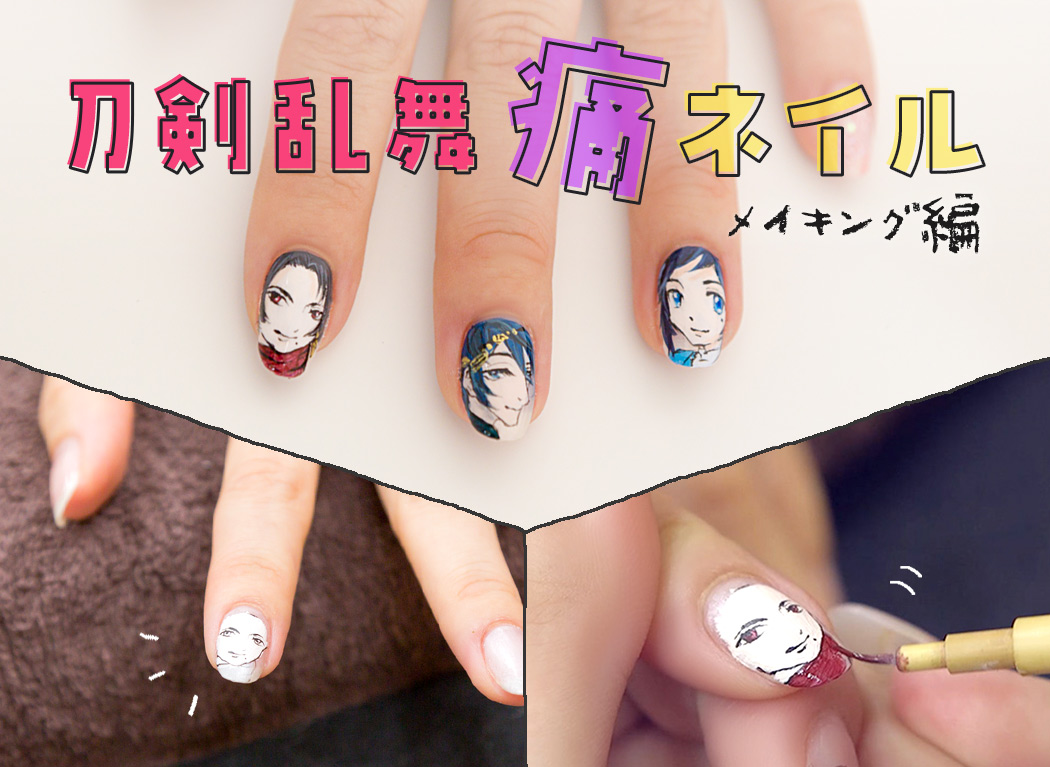
Ita-Nails refer to a form of nail art where you paint your favorite characters onto your nails. It's the perfect type of nail art for you to always be by the side of your favorite character!


There're many anime and manga lovers out there who want to try out Ita-Nail art, but just not sure where to begin.... Indeed, it's tricky to capture a character in the limited space the canvas of your nails offer.


To solve this problem, we made our way to professional nail artist, Mr. Miyamoto, who offers Ita-Nail services! We introduced a 1 minute video to you in our previous article, but we'll bring to you the detailed instructions, from the base layer, to the lining, coloring, shadowing, and final details!

We tried drawing Touken Ranbu's Kiyomitsu Kashu!
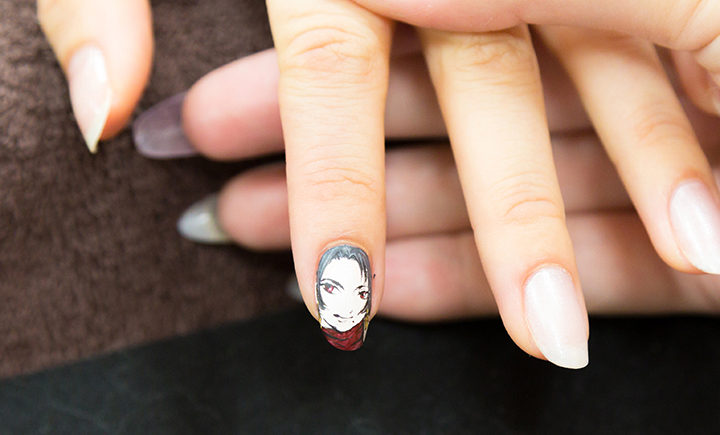
We'll be drawing one of the main characters from the anime Touken Ranbu, Kiyomitsu Kashuu today. He's also commonly known as Soji Okita's well-loved sword. His sexy gaze and mole above his lips are his selling points.

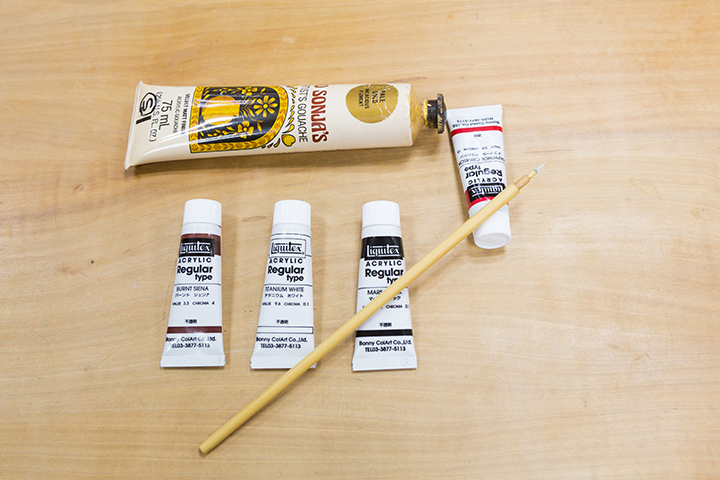
Here are the tools we'll be using!

The tools involved are acrylic paints in brown, white, black, red and gold, as well as a fine brush. The standard acrylic paints you use in art class are no problem as well.


Well then, let's go!

1. Base Layer

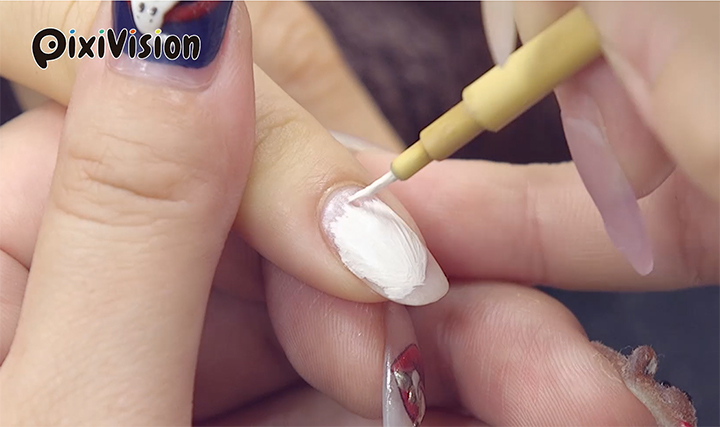
Let's start with the base layer of the outline. You can create the character's skin color with some brown on top of a white base.


In digital art, you may often start by doing up the line art, but in the case of Ita-Nails, it's harder to make a mistake if you start with the skin color before drawing the lines in.

2. Lining

Next, we'll carefully outline the character's features with black. It's difficult to maintain and accurate balance between the features of the face in Ita-Nail art, and this step is said to affect the final quality.


Mr. Miyamoto has 2 tips for us to complete our lining successfully.

Point 1: Have a 'map' for the balance of the face
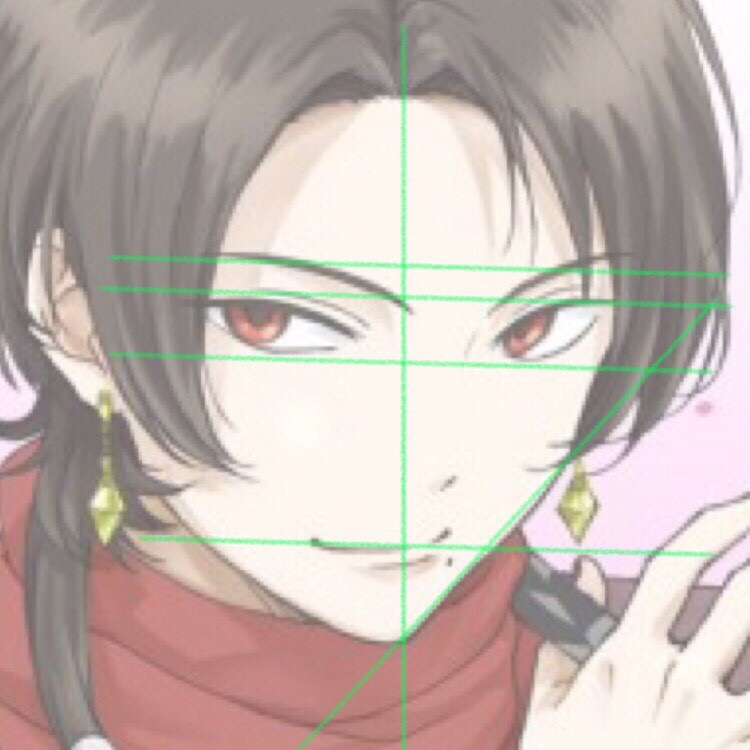
Create your own 'map' by lining your reference picture, so that you know the location of each part. By doing this, your sense of balance will improve.

Point 2: Make your lines as thin and fine first
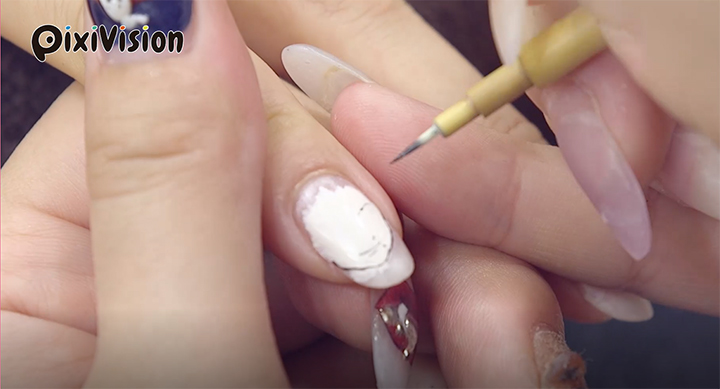
You cannot undo a mistake in Ita-Nail art. As such, try going in with thin strokes, slowly and carefully first. Paint over with thicker lines once you're sure of your positioning.

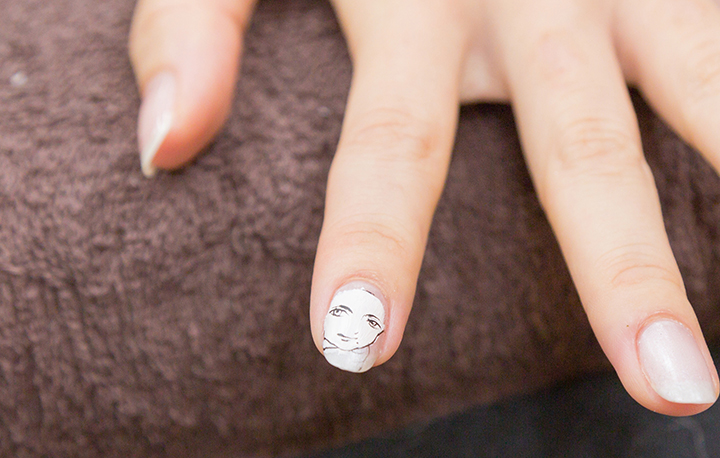
Here's the final result of the lining. 


We've finished drawing in the parts of the face. You don't have to draw in the hair here. He looks a little pitiful without hair.....lol

3. Coloring

Next up, we'll fill in the colors. 


Firstly, let's make the paint used in his eyes and scarf by mixing black and red.
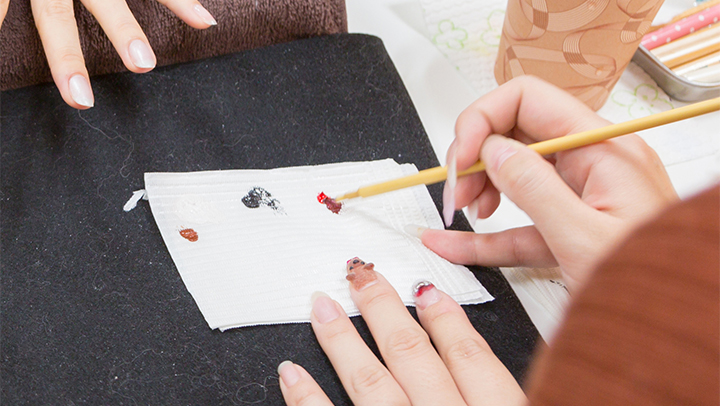
The point is to not put in too much black. Squeeze in red and black paint separately onto your palette, take a tinge of black, and more red, and mix them together to give a dark maroon color.

Once you've finalized your color, start filling it in. 


Paint in the eyes and the scarf. We'll draw in the folds of the scarf last, so just boldly go across it here.
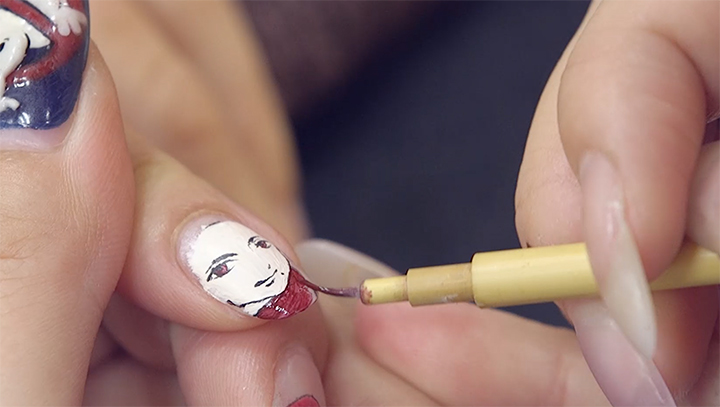
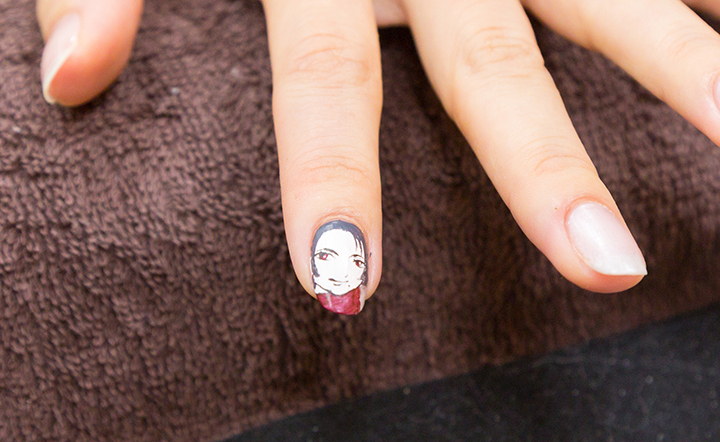
Unlike digital art, you cannot change the order of the layers, so start from the bottom layer and work your way up. Once you've finished all the coloring, add in the hair while checking the balance.

Kiyomitsu Kashuu's jet black hair is very representative of him, and we'll be using a deep grey here. If you jump right in with black for the hair, you'll be unable to add in the shadows after that, so do start with a lighter color.

We're done with the coloring! It's already looking pretty good. However, real skill actually begins here. Bring out a 3D effect with shadowing and highlighting. 

4. Highlighting and Shadowing

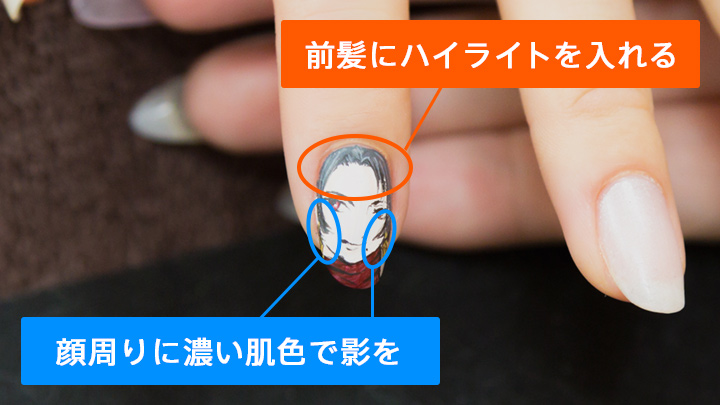
Firstly, mix the beige you used for the skin color with brown. This will be used for the shadows on the hair. 


You will be able to bring out a more 3D effect with the hair if you add in shadows and highlights. Use black for the shadows on the dark grey hair, or grey highlights by adding a little black to white.
5. Complete!

Kashuu Kiyomitsu is complete! It took about 30 minutes. 

Let's find out what the major things to keep in mind are!

- Great job! Can you tell us some things you took note of while painting this time?

I paid more attention to his the highlights on the parts of his fringe that stands up, to create a realistic 3D effect. And also to go over the lines again with black paint to give it a bolder look.

- Do you have some tips for not making mistakes?

Taking note of the curves of the nail. The curves get steeper nearing the sides of the nails, so try to keep the face in the center of the nail. If you draw on the sides of the nail, the character may appear too fat or crooked so do take note.

Along with the Kiyomitsu Kashuu (Touken Ranbu) tutorial, we've also released a tutorial video for Yamatonokami Yasusada and Munechika Mikazuki.


Find their tutorial video here:

▶Ita-Nail Video -We tried drawing Kiyomitsu Kashuu, Yamatonokami Yasusada, Munechika Mikazuki (Touken Ranbu)!


Next up, we'll be introducing Ita-Nail art of characters from Jojo's Bizarre Adventure! How are we going to conquer these characters, famous for their minute details...? Don't miss it!

Share this article
  • Share
  • Post
  • Share
  • Post
Follow pixivision on Facebook!
Find us on X too!
Follow @pixivision
Stay updated with pixivision's daily features!

Newest articles tagged Behind the Art

  • The Making of 13 Copic Drawings - A Lesson in Coloring

    The Making of 13 Copic Drawings - A Lesson in Coloring

  • The Making of 15 Watercolor and Colored Pencil Drawings - A Glimpse Behind the Scenes

    The Making of 15 Watercolor and Colored Pencil Drawings - A Glimpse Behind the Scenes

  • Are you ready for Comiket? Useful Techniques For Your Event Booth

    Are you ready for Comiket? Useful Techniques For Your Event Booth

  • Wait a second! (Almost) Useless Tutorials

    Wait a second! (Almost) Useless Tutorials

View more▶︎

Follow pixivision's
official accounts!

p-chanMonthly Ranking
  • Illustrations

    Fan Art of Kisaki (Swimsuit) from B...

  • Illustrations

    Drawings of Patterned Bikinis - Pre...

  • Illustrations

    Drawings in Purple - Luscious Lilac

  • Illustrations

    Drawings of Upward Glances - Puppy-...

  • Illustrations

    Drawings of Falling and Floating - ...

p-chanFeatured
  • Illustrations

    Fan Art of the Characters from Dand...

  • Illustrations

    Drawings Featuring Pools - Make a S...

  • Illustrations

    Drawings of School Uniforms with Ca...

  • Illustrations

    Fan Art of SILENT HILL f [Spoiler/C...

  • Illustrations

    Drawings Featuring Sandals - Light ...

Follow pixivision's
official accounts!

  • Top
  • About pixivision
  • Suggest a theme
  • English
  • 简体中文
  • 繁體中文
  • 한국어
  • ภาษาไทย
  • Bahasa Melayu
  • 日本語
  • pixivision
  • About pixiv Inc.
  • Terms of Use
  • Contact Us
  • Advertising
  • Privacy Policy
©pixiv